

If you’re beginning your journey in Android app development, the first tool you’ll need is Android Studio—the official IDE for creating Android applications. This guide will walk you through the step-by-step installation and setup of Android Studio on Windows 10 and 11, and also outline the system requirements to ensure a smooth experience.
What is Android Studio?
Android Studio is the official Integrated Development Environment (IDE) for Android app development, built on JetBrains’ IntelliJ IDEA platform. It offers a robust set of tools and features that streamline and enhance the development process.
Key Features of Android Studio:
- Unified environment for developing Android apps across all device types
- Apply Changes feature to push code and resource updates without restarting the app
- Flexible, Gradle-based build system
- Fast and feature-rich Android Emulator
- Integration with GitHub and pre-built code templates
- Support for C++ and NDK
- Comprehensive testing tools and frameworks
- Built-in support for Google Cloud Platform, Firebase, and more
- Graphical UI tools that simplify app development
System Requirements for Android Studio on Windows
To run Android Studio efficiently, your system should meet the following specifications:
- Operating System: Windows 7/8/10/11 (32-bit or 64-bit)
- RAM: Minimum 4 GB (8 GB or more recommended)
- Disk Space: At least 2 GB free (4 GB recommended)
- IDE: ~500 MB
- Android SDK and emulator: ~1.5 GB
- Screen Resolution: Minimum 1280 x 800 pixels
How to Install Android Studio on Windows (Step-by-Step)
Step 1: Download Android Studio
Visit the Android Studio and click the Download Android Studio button.

- Accept the terms and conditions by ticking the checkbox

- Click Download, then Save File in the browser prompt
Step 2: Run the Installer
Once the download is complete:
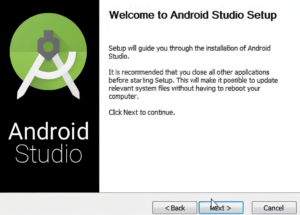
- Open the `.exe` file from your downloads
- Click Next in the setup dialog
- Choose an installation path and continue by clicking Next again
Step 3: Begin Installation
Android Studio will now start installing. Once completed:

Click Next, then Finish
Step 4: Initial Launch
After installation, Android Studio may ask if you want to import previous settings:

Select “Do not import settings” (recommended for new users)

Click OK
Step 5: SDK Component Setup

Android Studio will now search for SDK components. Once found:

You’ll see the Welcome screen

Click Next
Step 6: Configure Installation Settings

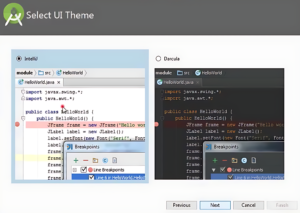

- Choose the Standard setup option
- Select your preferred theme:
- IntelliJ (Light)
- Dracula (Dark)
- Click Next, then Finish to begin downloading SDK components
Step 7: Finalize Installation
Once all components are downloaded:

Click Finish
Android Studio will launch automatically
Step 8: Start a New Android Project
To begin your first app:

Click on “Start a new Android Studio project”
Follow the on-screen instructions to set up your first Android application
> Need help running your first project? Check out .
Conclusion
Installing Android Studio on Windows is a straightforward process. With its powerful tools, user-friendly interface, and support for modern Android development practices, Android Studio is the perfect companion for building innovative Android applications.
Whether you’re a beginner or an experienced developer, getting started with Android Studio opens the door to endless possibilities in the world of mobile development.
