Once you’ve successfully set up your Android project in Android Studio, it automatically generates a set of default files and code. Let’s walk through these files and learn how to run your first basic Android application.
Exploring the Project Structure
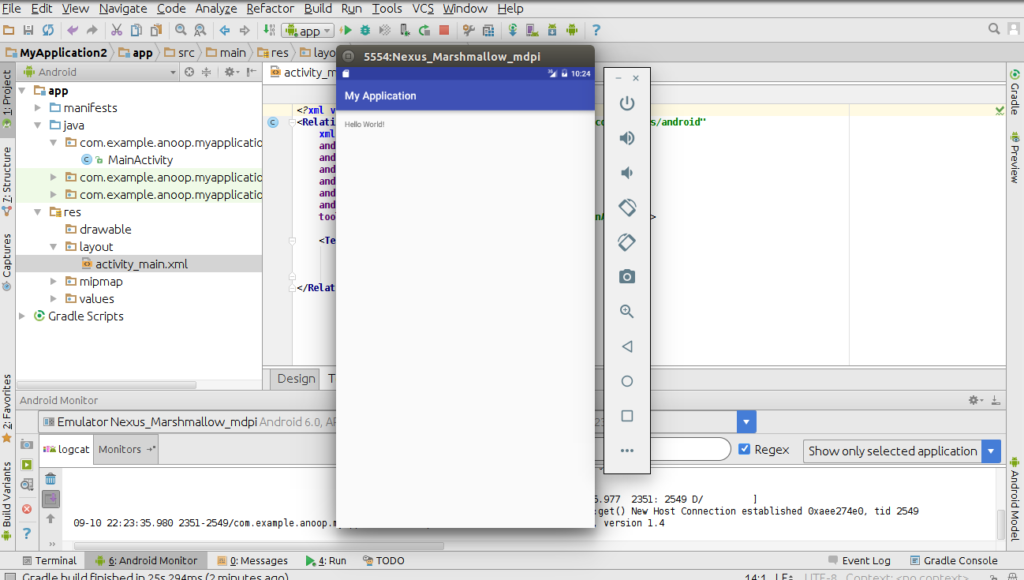
In the left panel of Android Studio, you’ll see the complete file structure of your app.
Java Folder
Inside the `java` directory, you’ll find a folder named after your package. This contains the main Java files of your application. For every activity you create, two files are generated:

- A Java file (e.g., `MainActivity.java`)
- An XML layout file (e.g., `activity_main.xml`)
The `MainActivity.java` is the default entry point of your app. This file defines an activity that extends the `AppCompatActivity` class. Activities are essential components in Android apps—they represent the screens with which users interact.
res > layout Folder
In the `res` (resources) folder, open the `layout` subfolder. Here you’ll find the XML file `activity_main.xml`, which defines the user interface for the `MainActivity`.

This XML file uses tags similar to HTML. The outermost tag usually defines the layout type—by default, this is `RelativeLayout`. This layout arranges UI components relative to each other or to the parent container.
Default TextView
Inside the layout, there is a `TextView` element added by default. It is a simple widget used to display text on the screen. Key attributes of this widget include:
`layout_width` and `layout_height`: These define the dimensions. When set to `”wrap_content”`, the size adjusts according to the content.
`text`: This attribute specifies the text displayed within the TextView. For example, `android:text=”Hello World!”`
Understanding the `onCreate()` Method
In the `MainActivity.java` file, there’s an overridden `onCreate(Bundle savedInstanceState)` method. This method is called when the activity is first created and is used to initialize the activity—for example, setting the layout using `setContentView(R.layout.activity_main);`.
Note: The `onCreate()` method is only called once, when the activity starts for the first time.
Running the App
Once you’ve understood the basics, it’s time to run your app!

Step-by-Step Guide:
1. Click the “Run” Button
Locate the green triangle-shaped “Run” icon in the toolbar at the top and click on it.
2. Choose a Device
A popup will appear prompting you to select a deployment target:
- Emulator: Select one of the available virtual devices.
- Physical Device: Connect your Android phone via USB.
Make sure:
- Developer Options are enabled.
- USB Debugging is turned ON.
3. Click OK
Once your device is selected, click OK to launch the app.
Emulator vs Physical Device
While emulators are helpful for testing, they require more system resources. Here are a few tips:
- Emulator RAM Usage: Emulators can consume a significant amount of RAM. A minimum of 4GB RAM is recommended for smooth performance.
- Performance Boost: More RAM (8GB or more) leads to better emulator responsiveness.
On the emulator, you’ll see your app in action. It includes Android navigation buttons such as Home, Back, and Power, just like a real Android device.
Conclusion
Running your first Android app in Android Studio is an exciting milestone. By exploring the default project structure, understanding the main files, and launching the app via an emulator or connected device, you gain a foundational understanding of how Android development works. With this setup complete, you’re now ready to build and customize your own apps!